It’s been far too long since I last published anything on this blog. Life got busy, priorities shifted, and writing took a backseat. But with 2026 here, I’ve made a commitment to myself to be more active in sharing what I’m learning and building. This blog has always been a space for me to document my journey as a developer, and I want to get back to that.
So here we are, starting fresh with something I’ve been working on for the past few months—running my personal projects on a self-hosted VPS using Dokploy. It’s been an incredible learning experience, and I’m excited to share it with you. In this article, I’ll walk you through my entire journey—from setting up a fresh VPS to deploying multiple applications with proper security hardening along the way.
Why Self-Host?
Before diving in, you might wonder why go through all this trouble when platforms like Vercel or Netlify exist. For me, it was about learning, control, and cost-effectiveness. With a single VPS, I can run multiple applications, databases, and services for a fraction of what multiple managed services would cost. Plus, understanding the infrastructure behind your applications is invaluable as a developer.
Part 1: Setting Up the VPS
Getting Started
The first step is choosing a VPS provider. I won’t recommend a specific one since pricing and availability change frequently, but popular options include DigitalOcean, Linode, Vultr, and Hetzner. For most personal projects, a VPS with 2GB RAM and 1-2 CPU cores is sufficient to start.
Once you’ve purchased your VPS, you’ll receive:
- An IP address
- A root username (usually
root) - A temporary password
Connect to your VPS using SSH:
ssh root@your_vps_ipEnter the password when prompted. Congratulations, you’re now connected to your server!
Part 2: Hardening VPS Security
A fresh VPS with only root access and password authentication is a security risk. Let’s lock it down properly.
Creating a New User
Running everything as root is dangerous. Let’s create a new user with sudo privileges:
adduser yourusernameYou’ll be prompted to set a password and some optional information. Next, add this user to the sudo group:
usermod -aG sudo yourusernameNow exit your current SSH session:
exitConnecting with Your New User
SSH back into your VPS using the new user:
ssh yourusername@your_vps_ipDisabling Root Login
Once you’ve confirmed your new user works, let’s disable direct root login. Edit the SSH configuration:
sudo nano /etc/ssh/sshd_configFind the line PermitRootLogin and change it to:
PermitRootLogin noDon’t restart SSH yet—we have more security measures to implement.
Setting Up SSH Key Authentication
Password authentication is vulnerable to brute-force attacks. Let’s switch to SSH key-pair authentication, which is much more secure.
On your local machine (not the VPS), generate an SSH key pair:
ssh-keygen -t ed25519 -C "your_email@example.com"Follow the prompts. You can accept the default location (~/.ssh/id_ed25519) and optionally set a passphrase for extra security.
Now, copy your public key to the VPS:
ssh-copy-id yourusername@your_vps_ipTest the key-based authentication by opening a new terminal and connecting to your VPS. You should be able to log in without entering your password.
Disabling Password Authentication
Once you’ve confirmed key-based authentication works, disable password authentication entirely. Edit the SSH config again:
sudo nano /etc/ssh/sshd_configFind and modify these lines:
PasswordAuthentication noPubkeyAuthentication yesChallengeResponseAuthentication noRestart the SSH service to apply changes:
sudo systemctl restart sshdYour VPS is now significantly more secure. Only someone with your private SSH key can access it.
Part 3: Domain and Cloudflare Setup
Purchasing a Domain
Purchase a domain from any domain registrar. I use Cloudflare Registrar for its competitive pricing and seamless integration, but Namecheap, Google Domains, or any other registrar works fine.
Adding Your Domain to Cloudflare
If you didn’t buy directly from Cloudflare, you’ll need to add your domain to Cloudflare’s DNS management:
- Create a free Cloudflare account at Cloudflare
- Click “Add a Site” and enter your domain name
- Choose the Free plan
- Cloudflare will scan your existing DNS records
- Update your domain’s nameservers at your registrar to point to Cloudflare’s nameservers (they’ll provide you with two nameserver addresses)
- Wait for DNS propagation (usually takes a few minutes to a few hours)
Once set up, you’ll manage all DNS records through Cloudflare’s dashboard.
Part 4: Installing Dokploy
What is Dokploy?
Dokploy is an open-source Platform as a Service (PaaS) that simplifies deploying applications on your own infrastructure. Think of it as your personal Heroku or Vercel, but running on your VPS.
Installation
The installation process is straightforward. Following the official documentation at Dokploy Docs, run the installation command on your VPS:
curl -sSL https://dokploy.com/install.sh | shThe script will install Docker, Docker Compose, and set up Dokploy. This process takes a few minutes. Once complete, you can access Dokploy’s dashboard by navigating to:
http://your_vps_ip:3000Configuring Domain Access with HTTPS
Accessing Dokploy via IP and port 3000 isn’t ideal. Let’s set up a proper domain with HTTPS.
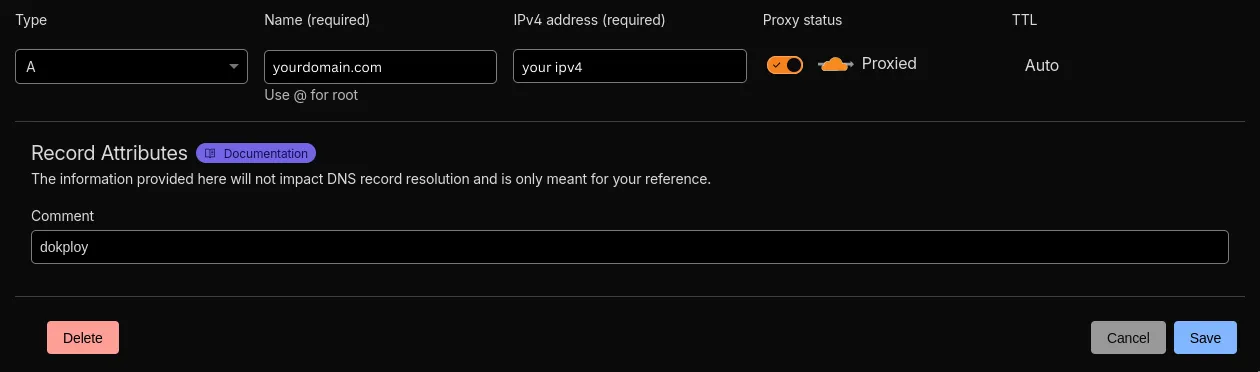
First, add an A record in Cloudflare pointing to your VPS:
- Log into Cloudflare
- Select your domain
- Go to DNS → Records
- Click “Add record”
- Type: A
- Name:
dokploy(this creates dokploy.yourdomain.com) - IPv4 address: your VPS IP
- Proxy status: Proxied (orange cloud icon)
- Save
Now configure Dokploy to use this domain. In the Dokploy dashboard:
- Go to Settings → Server
- Update the “Server Domain” field to
dokploy.yourdomain.com - Enable “Let’s Encrypt SSL” for automatic HTTPS certificate
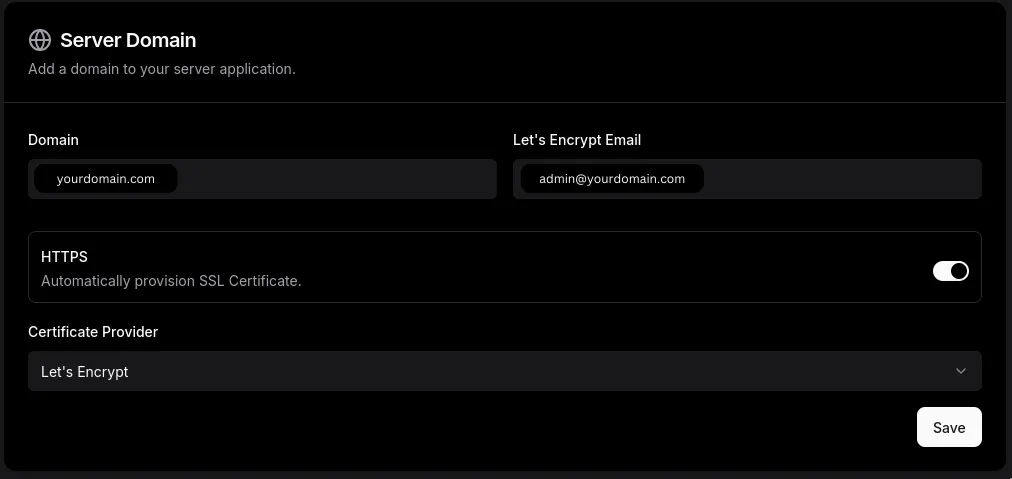
Dokploy will automatically obtain an SSL certificate from Let’s Encrypt. After a few moments, you can access your Dokploy dashboard at:
https://dokploy.yourdomain.comNo more port numbers, and it’s fully secured with HTTPS!
Part 5: Configuring the Firewall
Security doesn’t stop at SSH hardening. Let’s configure a firewall to only allow necessary traffic.
We’ll use UFW (Uncomplicated Firewall), which is simple and effective:
sudo apt install ufwSet default policies to deny incoming and allow outgoing:
sudo ufw default deny incomingsudo ufw default allow outgoingAllow SSH, HTTP, and HTTPS:
sudo ufw allow 22/tcp # SSHsudo ufw allow 80/tcp # HTTPsudo ufw allow 443/tcp # HTTPSEnable the firewall:
sudo ufw enableCheck the status:
sudo ufw statusYour VPS now only accepts connections on these three ports. Everything else is blocked.
Part 6: Deploying Your First Application
Now for the exciting part—deploying an actual application!
Deploying My Personal Blog
My personal blog (https://github.com/albugowy15/bughowi.com) is containerized with Docker, and I publish images to GitHub Container Registry. This makes deployment through Dokploy straightforward.
Here’s how I deployed it:
-
Create a new project in Dokploy dashboard
- Click “Create Project”
- Give it a name (e.g., “Personal Blog”)
-
Add a service
- Select “Docker” as the service type
- Choose “Docker Image”
- Enter the image:
ghcr.io/albugowy15/bughowi.com:latest
-
Configure the domain
- In the service settings, add a domain
- Enter:
blog.bughowi.com - Enable “HTTPS”
- Save the configuration
-
Update Cloudflare DNS
- Go to Cloudflare DNS management
- Add an A record:
- Type: A
- Name:
blog - IPv4 address: your VPS IP
- Proxy status: Proxied
- Save
-
Deploy the application
- Back in Dokploy, click “Deploy”
- Dokploy will pull the image and start the container
After deployment completes, visit https://blog.bughowi.com and you should see your blog running! Dokploy automatically handles the SSL certificate and reverse proxy configuration.
Important note: Whenever you make changes to domain settings in Dokploy, remember to redeploy your application for the changes to take effect.
Part 7: Exploring More Possibilities
The beauty of Dokploy is its template marketplace. After successfully deploying my blog, I explored other applications I could self-host:
Applications I’m Currently Running
Vaultwarden: A self-hosted password manager compatible with Bitwarden clients. Having full control over my passwords is reassuring, and it’s completely free compared to Bitwarden’s premium tier.
Nextcloud: My personal cloud storage solution. I use it for file syncing, calendar, and contacts. It’s like having my own Dropbox and Google Drive combined.
Umami: A privacy-focused, open-source web analytics platform. I use it to track visitor statistics on my websites without compromising user privacy like Google Analytics does.
Each of these services runs in its own Docker container, managed by Dokploy, with its own subdomain and HTTPS certificate. The setup process is similar to what we did with the blog—choose a template, configure the domain, update DNS, and deploy.
Lessons Learned
This journey taught me several valuable lessons that I wish I’d known from the start. The most important one is that security should never be an afterthought. Taking the time to properly secure your VPS before deploying anything is crucial. Those extra steps with SSH keys and firewall configuration might feel tedious in the moment, but they can save you from a lot of headaches down the road. I’ve heard too many stories of compromised servers because someone skipped these basics, and I didn’t want to become one of them.
Finally, resource monitoring is something I wish I’d paid more attention to from the beginning. Docker containers can accumulate over time, and you might need to clean up old images and volumes periodically. I’ve had moments where my disk space filled up unexpectedly because I wasn’t keeping track of these things. Now I regularly check my VPS resources and do some housekeeping to keep everything running smoothly.
Helpful Resources
Throughout this journey, I found some excellent tutorials that really helped me understand the concepts better. If you’re looking for video walkthroughs or want to see these processes in action, I highly recommend checking out:
-
Dokploy is my absolute favorite way to deploy to a VPS in 2025 by dreamsofcode
- This video introduced me to Dokploy and showed me how powerful it can be for deploying applications to a VPS.
-
Self Host 101 - Set up and Secure Your Own Server by Syntax
- A comprehensive walkthrough of securing a VPS that covers many of the security hardening steps I followed in this guide.
These resources complemented the official documentation nicely and helped me troubleshoot when things didn’t work as expected.
Conclusion
Self-hosting with Dokploy has been incredibly rewarding. What started as a simple project to deploy my personal blog has evolved into a complete self-hosted infrastructure running multiple services I use daily.
The initial setup might seem daunting, but once everything is in place, deploying new applications becomes trivial. Dokploy abstracts away the complexity of Docker, reverse proxies, and SSL certificates while still giving you full control over your infrastructure.
If you’re comfortable with the command line and want to learn more about infrastructure, hosting, and deployment, I highly recommend giving this setup a try. Start with something simple like a static blog, get comfortable with the workflow, and gradually expand to more complex applications.
The total cost? For me, it’s about $5-10 per month for the VPS, significantly less than paying for multiple managed services separately. And the learning experience? Priceless.